THE WET-ON-WET METHOD
To start, angle the painting surface at 10 or 20 degrees. Wet the sky area fairly liberally and briskly with sweeping strokes. On rough surfaces this action will leave a few random irregular dry spots for accents. Unwanted spots can be covered over in the next stage. Leave larger dry irregular areas if you wish to create a prominent white cloud edge. Of course, you could wet the whole surface evenly for a soft fluffy cloud effect, as in Step 1.
Charge the brush with a moderate amount of a mixture of French Ultramarine and Burnt Umber of moderate intensity. More of one or other colour will determine how grey or bright a day you wish to portray. This is the base layer, so lay it on loosely in broad, preferably oblique, strokes, starting in one top corner. I use this as my tester corner. If the first stroke is too light, I can then stiffen the mixture immediately. I like a fairly strong toned corner anyway. As you move away from the corner, lighten the tone, varying the mixture with each brushload. If one corner is grey, make the other corner bluer. Where you wish to have white clouds, leave a gap of 2.5–5 cm (1–2 in) to allow for some diffusion of colour from the wet edges. Work your way down the sky, and by the bottom third dilute the grey towards the horizon, leaving it almost white around the middle third of the horizon.
Proceed immediately to the next stage (Step 2), where it gets more enjoyable. Use a significantly stiffer mixture of the same colours, with less water. This is important, because anything more dilute will make a mess and ‘cauliflowers’ may appear. Use this to darken clouds. As you move down the sky, narrow down the height of the clouds as they recede towards the horizon. Use Light Red mixed with French Ultramarine for the lower distant clouds with cooler tones. Do not forget to vary the size of the clouds.
Then, while the surface is still quite wet, you are ready for the final accents. Fill the tip of the brush with strong pure French Ultramarine and drop this into one or two small areas among the grey clouds to suggest blue sky peeping through. If you place the spot of blue beside a white cloud, it will accentuate the white edge immensely. Try washing in a dash of dilute Raw Sienna at the mid-horizon, behind a mountain or a pale area within a white cloud. You will be surprised at how this lifts the colour in the sky.
Now stop! Lay the painting flat and let it dry. Do not rework any part of the sky before it is completely dry. There is a cut-off point when the paper is about two-thirds dry, beyond which any application of paint will spoil it. Some accentuation can be done after drying. Wet the area first with clean water, and then drop in a darker, stiffer paint lightly. This exercise should take you no more than ten minutes. I call it the ‘seven-minute sky’ simply to emphasize the key element of the technique – its swift application. A loosely painted, fresh-looking sky only works well while the surface of the paper remains fairly wet.
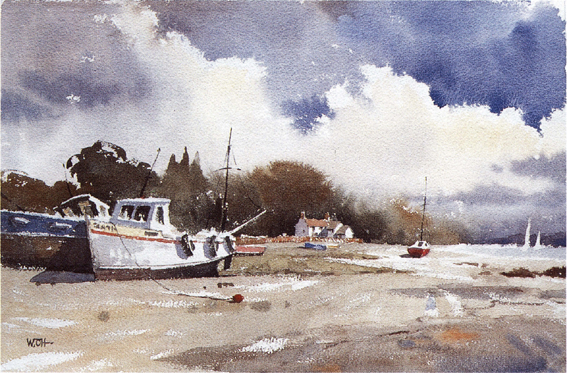
LOW TIDE AT PIN MILL, SUFFOLK
watercolour, 30 ? 46 cm (12 ? 18 in)
A sharp white cloud edge was obtained by keeping the upper cloud border dry while wetting the rest of the sky area. The contour was further shaped while working in a stiff wash of French Ultramarine. Light Red was mixed in for more interest in the sky.
When the sky is dry, you will notice that the colours are about 10 or 25 per cent lighter. This may disappoint initially, but when the whole picture is completed, you will appreciate that the lighter sky contrasts well with the landscape below, and it recedes into the distance where it belongs. Practise and experiment with different colours and tones, and you will develop your own version of the seven-minute (more or less) sky!
5
THE LONGER VIEW
I always have problems with my foregrounds. Can you offer some help on how to tackle them successfully?
Answered by: Jackie Simmonds
Foregrounds can cause all sorts of problems. Too much detail, and the viewer’s eye is held firmly in the foreground and fails to explore the rest of the picture. Too little attention to the foreground, however, may result in a boring, unconsidered area at the base of the picture. Often the main problem is that the student has not taken on board the idea that the foreground area of a painting has a purpose, and that purpose is usually – although there are no hard and fast rules in painting – to lead the viewer’s eye into the scene. Even in the shallow space of a still life, or an intimate corner of a landscape, the foreground of the picture needs to be carefully considered.
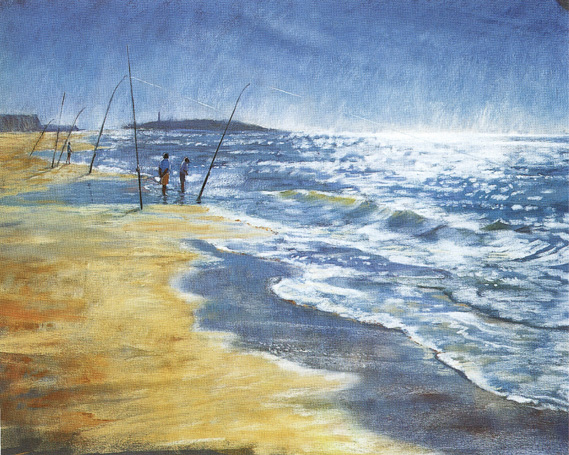
CAPE TRAFALGAR FISHERMEN
pastel on pastelcard, 46 ? 66 cm (18 ? 26 in)
I placed the horizon high in the rectangle to leave plenty of space for the foreground. In this way I was able to use the wave tops and edges, and the edge of wet sand, to draw the eye firmly towards the fishermen. A large foreground emphasized the emptiness of the beach, bar a few fishermen, and gave me the opportunity to paint the wonderful light on the sea, which was as important an element as any other in the picture.
Более 800 000 книг и аудиокниг! 📚
Получи 2 месяца Литрес Подписки в подарок и наслаждайся неограниченным чтением
ПОЛУЧИТЬ ПОДАРОКДанный текст является ознакомительным фрагментом.